Table of Contents
Information
Lightning is a simple yet expressive web framework for Java.
Our design goals are:
- To provide the convenience of save-and-refresh development in Java
- To provide powerful debugging tools that speed up development
- To include a built-in web server that allows developers to get set up quickly by writing purely Java
- To provide APIs that are convenient and easy to learn for both beginners and professionals
- To include the core functionality needed to build secure, scalable modern web applications
- To give developers the freedom to use Lightning with the tools they know and love
Built-In Features:
- Routing (w/ wildcards and parameters)
- Path-Based Filters (w/ wildcards and parameters)
- Templating (w/ Freemarker by default)
- Emails (via SMTP)
- SSL
- MySQL (w/ connection pooling, transactions)
- Sessions
- Authentication
- Multipart Requests/File Uploads
- Form Validation
- Async Handlers/Server-Sent Events
- Web Sockets
- HTTP2 & HTTP2C Support
- Dependency Injection
- Debug Mode
- ...and so much more!
Examples
Lightning maintains an up to date repository containing code examples, tutorials, and a list of open source projects using the framework.
Getting Started
To use Lightning, simply create a new Maven project and add Lightning as a dependency. In order to use Lightning effectively, you need to follow Maven's directory structure conventions. An example pom.xml is included below for your convenience.
pom.xml file that specifies the needed dependencies. Most modern Java IDEs include built-in support for Maven.To get started in Eclipse, save the sample
pom.xml below in a new folder. Then, choose File > Import > Existing Maven Project and browse to the folder you created. Maven will automatically download and install the dependencies you need to get started.
<project xmlns="http://maven.apache.org/POM/4.0.0"
         xmlns:xsi="http://www.w3.org/2001/XMLSchema-instance"
         xsi:schemaLocation="http://maven.apache.org/POM/4.0.0 http://maven.apache.org/xsd/maven-4.0.0.xsd">
  <modelVersion>4.0.0</modelVersion>

  <groupId>your-group-id</groupId>
  <artifactId>your-project-id</artifactId>
  <version>0.0.1-SNAPSHOT</version>
  <packaging>jar</packaging>

  <name>your-project-id</name>
  <url>your-project-url</url>

  <properties>
    <project.build.sourceEncoding>UTF-8</project.build.sourceEncoding>
  </properties>

  <build>
    <plugins>
      <plugin>
        <groupId>org.apache.maven.plugins</groupId>
        <artifactId>maven-compiler-plugin</artifactId>
        <version>3.2</version>
        <configuration>
          <source>1.8</source>
          <target>1.8</target>
        </configuration>
      </plugin>
    </plugins>
  </build>

  <dependencies>
    <dependency>
      <groupId>edu.rice.mschurr</groupId>
      <artifactId>lightning</artifactId>
      <version>0.0.2</version>
    </dependency>
  </dependencies>
</project>
mvn install in the cloned folder. This will install the latest version locally onto your machine and allow you to use it in your projects as if it was available from Maven Central. For some IDEs (e.g. Eclipse), simply importing the downloaded Maven project folder into your IDE will be sufficient.Next, you'll want to set up logging by adding a logback.xml file. See Logging for an example logback file.
Next, you'll want to write a launcher for your application. You will run this launcher class in order to start the built-in web server.
package myapp;
import lightning.Lightning;
import lightning.config.Config;

public final class AppLauncher {
  public static void main(String[] args) throws Exception {
    // Lightning requires some configuration information.
    // In particular, we must tell it what package(s) should be scanned for routes.
    Config config = new Config();
    config.scanPrefixes = ImmutableList.of("myapp.controllers");
    config.server.hmacKey = "SOMETHING LONG AND RANDOM!";

    // Launch the server and block the thread until the server exits.
    (new LightningServer(config)).start().join();
  }
}
Next, let's add a controller that displays a simple hello world page.
package myapp.controllers;
import lightning.ann.*;
import static lightning.enums.HTTPMethod.*;
import static lightning.server.Context.*;

@Controller
public final class HomeController {
  @Route(path="/", methods={GET})
  public void handleHomePage() throws Exception {
    response().write("Hello World!");
  }
}
To view your application, run AppLauncher and navigate to http://localhost/ in the web browser of your choice.
server.port property to change the port that the built-in server binds to. See here for a complete list of available options. See here for instructions on integrating third-party databases and libraries with Lightning.Using an SQL Database
First, you need to configure a database by modifying your launcher:
...
public final class AppLauncher {
  public static void main(String[] args) throws Exception {
    ...
    // Add a MySQL database:
    config.db.host = "localhost";
    config.db.port = 3306;
    config.db.user = "root";
    config.db.pass = "root";
    config.db.name = "lightning";
    ...
  }
}
You can now issue queries in your controllers. Let's create an example table and add some data:
CREATE TABLE tinyurls (
  code varchar(255) not null,
  url mediumtext not null,
  user_id int(64) unsigned not null,
  last_updated int(64) not null,
  last_clicked int(64) not null default 0,
  click_count int(64) not null default 0,
  PRIMARY KEY(code),
  FOREIGN KEY(user_id) REFERENCES users(id) ON DELETE CASCADE
) CHARACTER SET utf8 COLLATE utf8_general_ci;

INSERT INTO tinyurls (code, url, user_id, last_updated, last_clicked, click_count)
    VALUES ('facebook', 'http://www.facebook.com/', 0, 0, 0, 0);

INSERT INTO tinyurls (code, url, user_id, last_updated, last_clicked, click_count)
    VALUES ('google', 'http://www.google.com/', 0, 0, 0, 0);
To retrieve this data in your app and format it as JSON you can issue a query:
package myapp.controllers;
import lightning.ann.*;
import static lightning.enums.HTTPMethod.*;
import static lightning.server.Context.*;
import java.util.*;

@Controller
public final class ListUrlsController {
  @Route(path="/urls/json", methods={GET})
  @Json // Returned object should be JSONified and written to response.
  public Object handleListUrlsJson() throws Exception {
    return fetchUrls();
  }

  public List<Map<String, Object>> fetchUrls() throws Exception {
    List<Map<String, Object>> rows = new ArrayList<>();

    try (NamedPreparedStatement query = db().prepare("SELECT * FROM tinyurls;")) {
      try (ResultSet result = query.executeQuery()) {
        while (result.next()) {
          Map<String, Object> row = new HashMap<>();
          row.put("code", result.getString("code"));
          row.put("url", result.getString("url"));
          rows.add(row);
        }
      }
    }

    return rows;
  }
}
For more information, see the Lightning SQL Documentation.
Rendering Templates
We can extend the above controller to display the URLs as HTML instead of JSON by using a template.
First, we need to configure templates by modifying the launcher:
...
public final class AppLauncher {
  public static void main(String[] args) throws Exception {
    ...
    config.server.templateFilesPath = "myapp/templates";
    ...
  }
}
Second, we need to modify the controller to render the template:
...
public final class ListUrlsController {
...
  @Route(path="/urls", methods={GET})
  @Template("urls.ftl")
  public Object handleListUrls() throws Exception {
    // Return the view model for urls.ftl.
    return ImmutableMap.of("urls", fetchUrls());
  }
...
}
Third, we need to write the template:
<#escape x as x?html>
  <#list urls as item>
    ${item.code} - ${item.url}<br />
  </#list>
</#escape>
For more information, see the Lightning Templates Documentation. You may also find the FreeMarker Documentation useful. If you would prefer to use a template language other than FreeMarker, you may configure one.
Static Files
To serve static files, configure a root directory by modifying your launcher:
...
public final class AppLauncher {
  public static void main(String[] args) throws Exception {
    ...
    // Specify a path in your project class path.
    // Prefer using a relative path so that you can package to a JAR.
    config.server.staticFilesPath = "myapp/static";
    ...
  }
}
All static files will be served on their paths relative to the root directory you specify. For example, with the above configuration, you can place an image at /src/main/resources/myapp/static/image.jpg and it will be served on http://localhost/image.jpg.
In production, Lightning will attempt to serve these files optimally (using memory-mapped buffers, in-memory caching, and HTTP caching). You may configure the behavior of these caches if you wish. In debug mode, all caching will be disabled to ensure that you receive the newest version of these files each time you refresh the page. In both modes, Lightning supports HTTP range queries.
Handling Forms
Consider the following web form for adding a new short URL:
<form action="http://localhost/urls/add" method="POST">
  Code: <input type="text" name="code" />
  URL: <input type="text" name="url" />
  <input type="submit" value="Add URL" />
</form>
You might write a handler for this form as follows:
package myapp.controllers;
import lightning.ann.*;
import lightning.enums.HTTPStatus;
import static lightning.enums.HTTPMethod.*;
import static lightning.server.Context.*;
...

public final class AddUrlController {
  @Route(path="/urls/add", methods={POST})
  public void handleAddUrl() throws Exception {
    validate("code").isLongerThan(2)
                    .isShorterThan(6)
                    .isAlphaNumericDashUnderscore();
    validate("url").isURL();

    if (passesValidation()) {
      db().transaction(() -> {
        try (NamedPreparedStatement q1 =
                 db().prepare("SELECT * FROM tinyurls WHERE code = :code;")) {
          q1.setString("code", queryParam("code").stringValue());
          try (ResultSet r1 = q1.executeQuery()) {
            // Abort and show a 400 page if a row exists.
            badRequestIf(r1.next(), "Provided code already in use.");
          }
        }

        db().prepareInsert("tinyurls", ImmutableMap.of(
          "url", queryParam("url").stringValue(),
          "code", queryParam("code").stringValue(),
          "user_id", 0,
          "last_updated", Time.now()
        )).executeUpdateAndClose();
      });

      response().write("Your URL has been saved.");
    } else {
      // Abort and show a 400 page.
      badRequest(validator().getErrorsAsString());
    }
  }
}
Speeding Up Development
You should enable debug mode to speed up your development process. You can do this by modifying your launcher:
public final class AppLauncher {
  public static void main(String[] args) throws Exception {
    ...
    config.enableDebugMode = true;
    config.autoReloadPrefixes = config.scanPrefixes;
    ...
  }
}
After enabling debug mode, you should find:
- Your code changes take immediate effect when you refresh the page in your browser without the need to restart the server (save-and-refresh development). In order for this feature to work, you'll need to make sure your IDE is configured to recompile automatically when you save.
- You will see in-browser stack traces when one of your route handlers throws an exception. In production, you would simply see a generic 500 Internal Server Error page which reveals no information about the error.
- You can see a route overview on http://localhost/~lightning/routes.
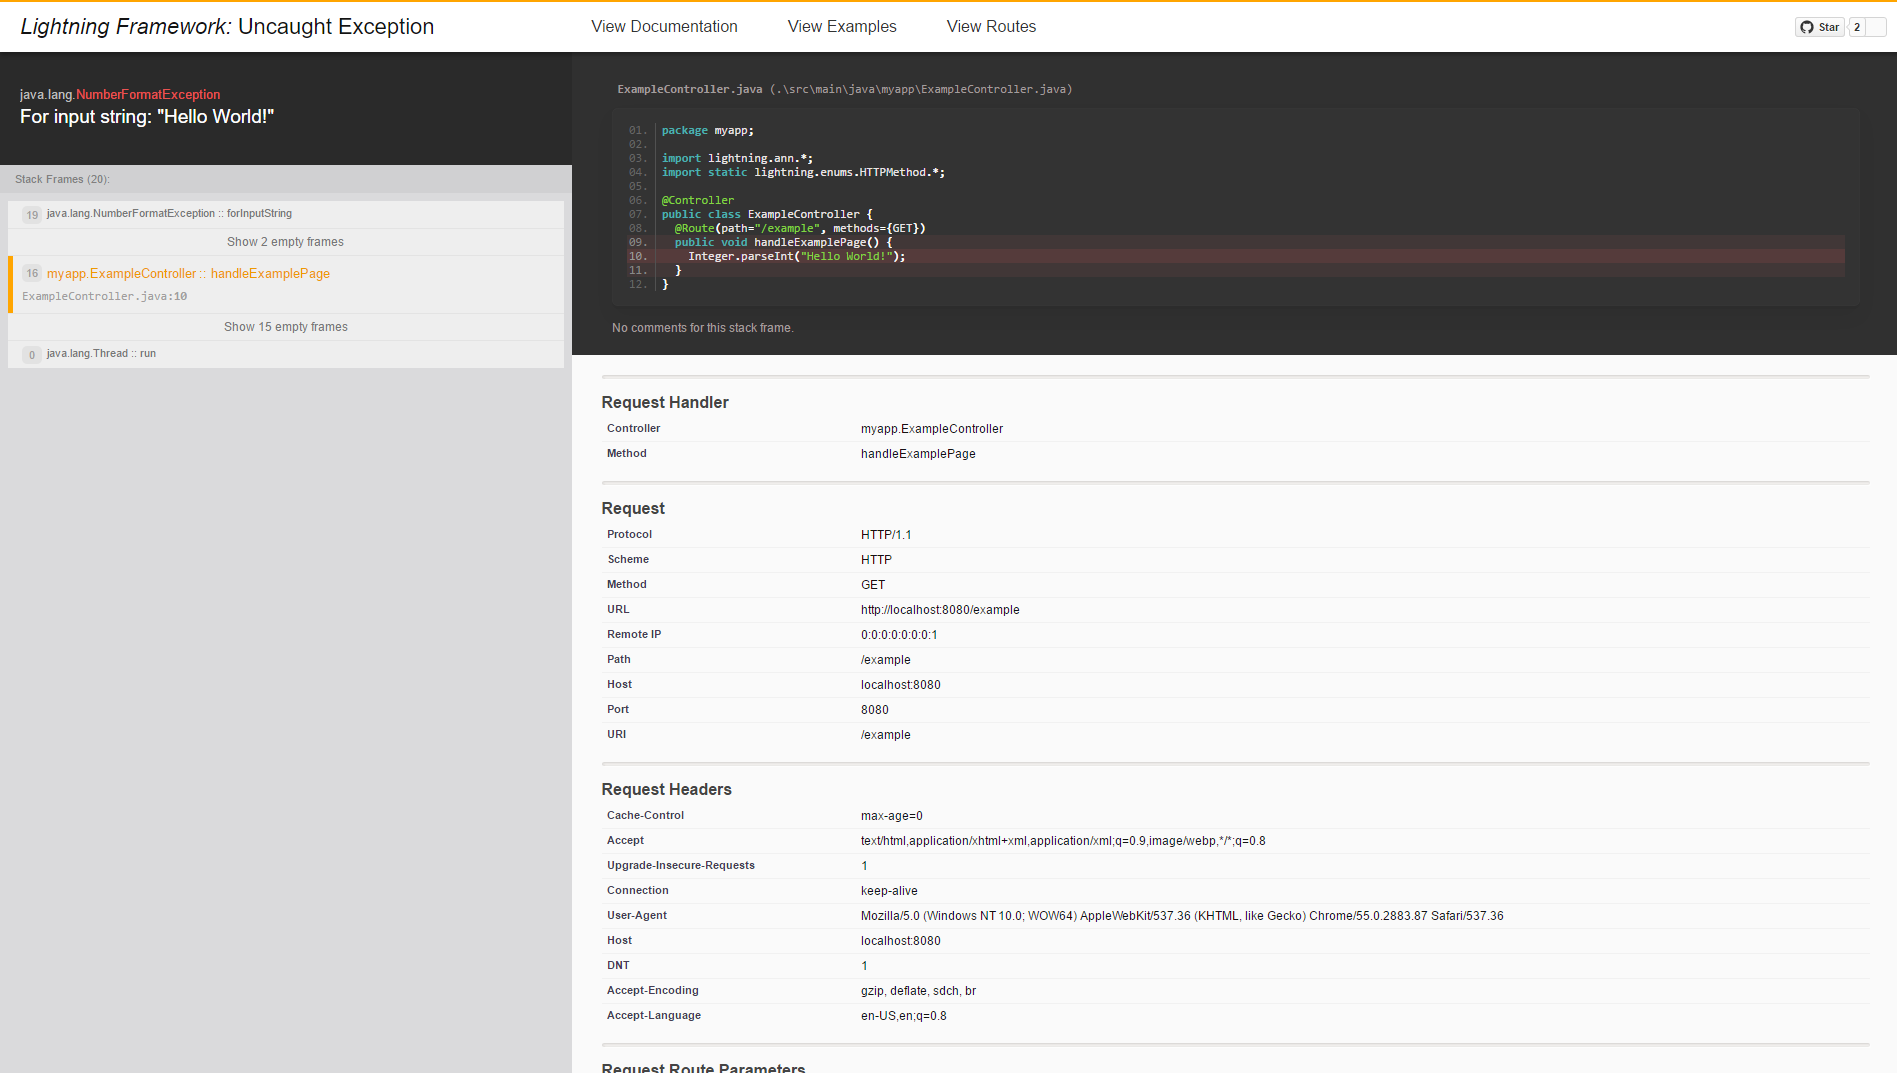 An in-browser debug stack trace.
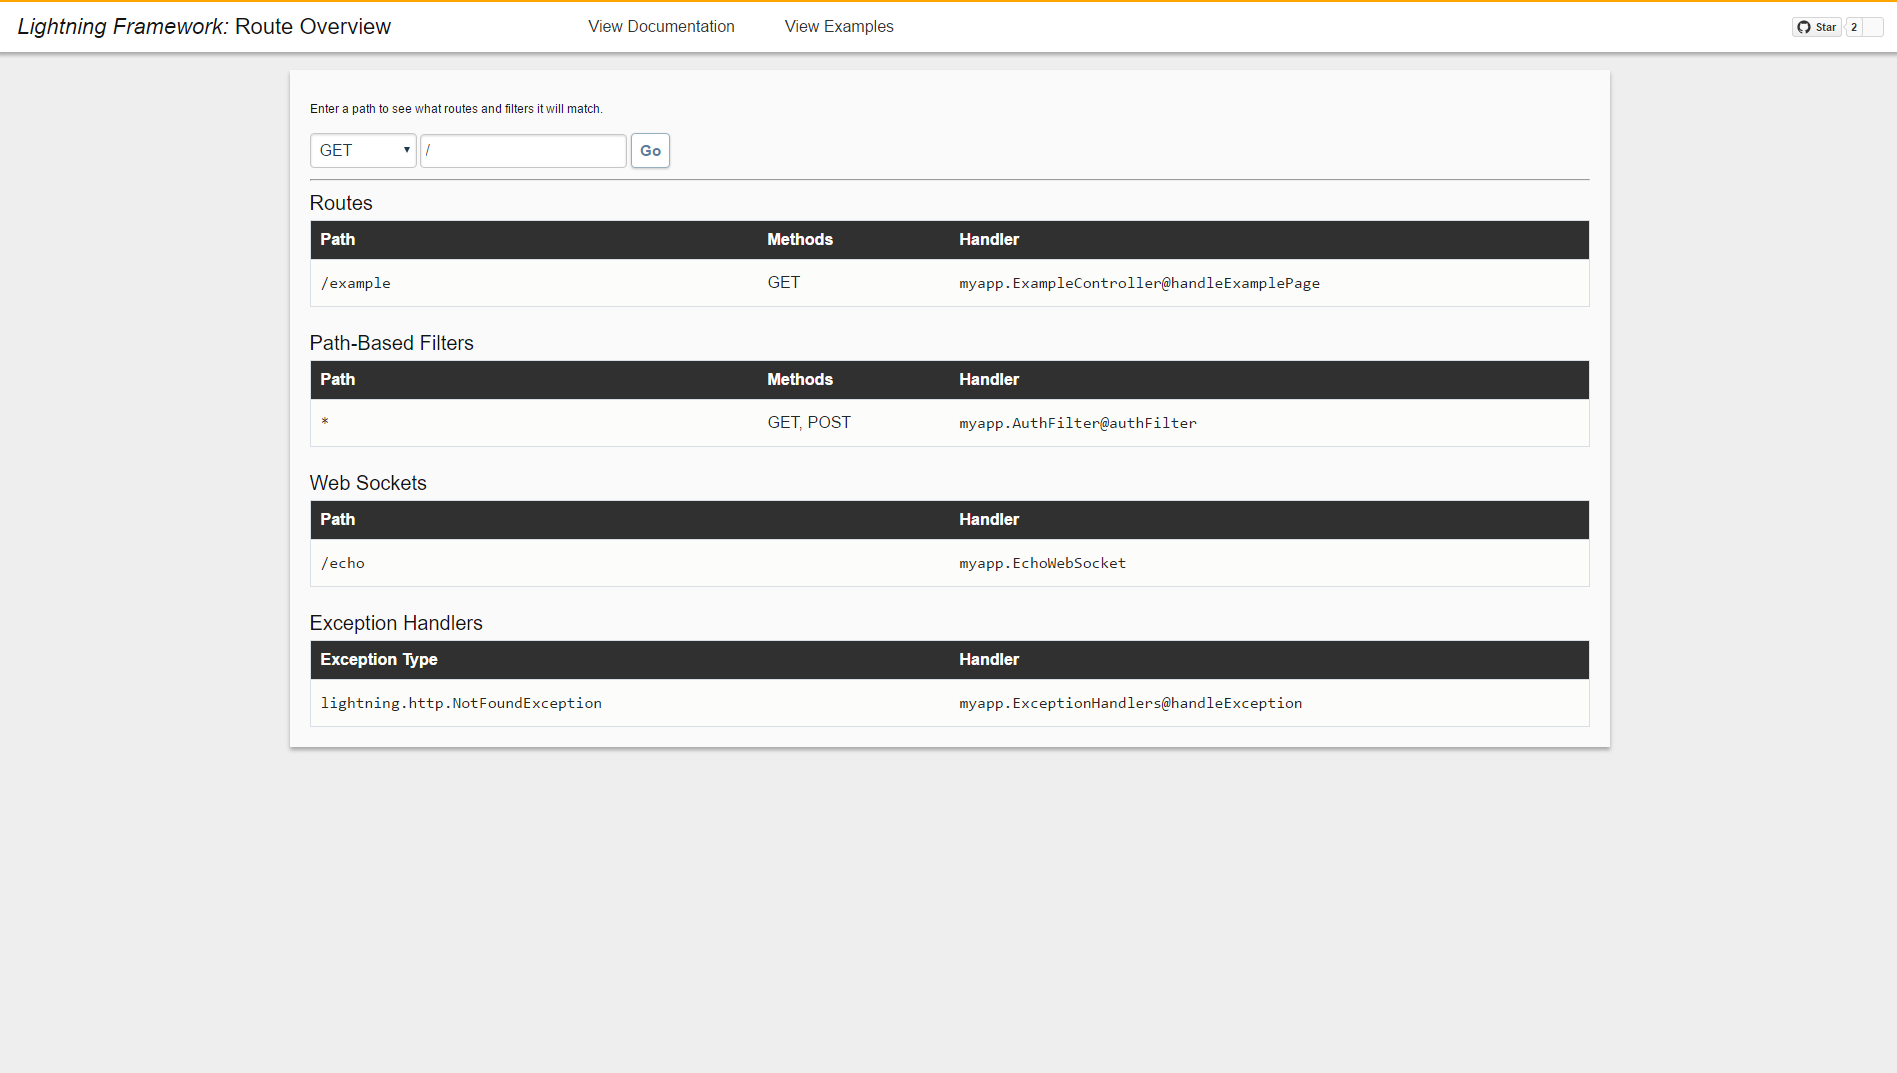 The in-browser route overview.
For more details, see debug mode.
Users and Authentication
You may provide your own third-party system for managing users, sessions, and authentication (see Using External Tools), or, for convenience, you may choose to utilize the ones provided by Lightning (see Authentication).
Configuration
Lightning is configured primarily by building an instance of lightning.config.Config and passing that instance to Lightning::launch. You can create the needed Config instance any way you like! You can build it in code, parse it from a file, parse it from command-line flags, or any combination thereof. Our goal is to provide maximum customizability and a production-ready web server. As such, we have included a huge number of configuration options with sensible defaults to let you get started quickly and scale when you need to. At this time, scanPrefixes and server.hmacKey are the only mandatory configuration options. The server will fail to start and display an error in cases where your configuration is invalid.
Config.java.A few components of Lightning are configured via dependency injection. In particular, the drivers for sessions, users, groups, auth, templates, json, and the cache are configured this way (see below).
Information about configuring various components of the framework follows.
Debug Mode
To enable debug mode, set enableDebugMode to true.
To enable automatic code reloading in debug mode, set autoReloadPrefixes to a list of Java package prefixes whose code can be safely reloaded while the server is running. See Debug Mode for more info.
Cookies
To enable the Cookies API, set server.hmacKey to a secret private key.
Static Files
To enable static file serving, set server.staticFilesPath to a path relative to ${project}/src/main/resources. File paths will be mapped directly to web server paths (for example, image.jpg in the folder you specify will be served on /image.jpg).
Additional configuration options are available to control the performance of static file caching; see Config.java for more information.
SSL
To use SSL, you must place your certificate in a Java Key Store (JKS) and then set the ssl options. You can find information on how to place your certificates (.pem/.crt) into a Java Key Store (.jks) in the Jetty Documentation: Configuring SSL.
HTTP/2
To enable HTTP/2, set server.enableHttp2 to true. Be sure to read the documentation on this configuration option! You may need to use a custom JVM boot path to use HTTP/2. HTTP/2 requires you to enable SSL.
Multipart Support
To enable HTTP multipart support, set server.multipartEnabled to true. server includes additional multipart-related options that you may wish to configure (e.g. to limit maximum request size). You might want to upload the temporary files location and thresholds at which parts are flushed to disk.
Template Drivers
To utilize templates, set server.templateFilesPath to a path relative to ${project}/src/main/resources.
You may bind a dependency injection for lightning.templates.TemplateEngine to utilize a custom template engine. By default, FreeMarker is used.
JSON Drivers
You may bind a dependency injection for lightning.json.JsonService to utilize a custom JSON engine. By default, Google's gson library is used.
Cache Drivers
You must bind a dependency injection form lightning.cache.CacheDriver to utilize the Cache APIs. By default, the Cache APIs will be unavailable.
Configure the mail property to set up access to an SMTP server or enable the logging mail driver in order to use the Mail APIs.
MySQL
Configure the db property to set up access to a MySQL database.
Session Drivers
No custom configuration is available at this time. By default, an SQL driver is used on the database configured in the db property. Make sure you have installed the schema needed.
User Drivers
No custom configuration is available at this time. By default, an SQL driver is used on the database configured in the db property. Make sure you have installed the schema needed.
Group Drivers
No custom configuration is available at this time. By default, an SQL driver is used on the database configured in the db property. Make sure you have installed the schema needed.
Auth Drivers
No custom configuration is available at this time. By default, an SQL driver is used on the database configured in the db property. Make sure you have installed the schema needed.
Custom Options
You can extend lightning.config.Config if you wish to add custom configuration options specific to your application.
package myapp.config;
import lightning.config.Config;

public final class MyAppConfig extends Config {
  public int myOption;
  public String myOtherOption = "DEFAULT";
}
You will still be able to pass your subclass to Lightning::launch thanks to the magic of polymorphism. If you wish to access your custom configuration options in your controllers, you should set up dependency injection for your custom configuration type:
injector.bindClassToInstance(MyAppConfig.class, config);
Debug Mode
To enable debug mode, configure enableDebugMode to true in your application launcher.
There are cases where you may wish to change the behavior of your application code when debug mode is enabled (for example, to disable caching done by your code). You can check (in your code) if debug mode is enabled by invoking context().isDebug() on lightning.server.Context.
Debug mode should never be enabled in production deployments as it exposes system internals and severely degrades scalability since it disables most caching.
In order to use debug mode, you must:
- Configure
projectRootPathto point to your project's root folder (wherepom.xmlis) - Follow Maven directory structure conventions (place code in
src/main/javaand resources insrc/main/resources)
If you enable debug mode, the following features will be activated:
- Enables automatic hot reloading of all Java classes defined within a package specified in your configured
autoReloadPrefixesby using a custom class loader. This includes all routes, exception handlers, filters, etc. defined within those packages. In order for this feature to work, you will want to configure your IDE to automatically recompile on save. It is important to understand that not all code can be safely reloaded! You should make sure that you understand the limitations of Java Class Loading (outlined below). In particular, types for which you have configured dependency injection and any code inlightning.*or any of its dependencies may not be reloaded safely. - Enables displaying exception stack traces and debug information in-browser. This debug page will show instead of the generic 500 Internal Server error page generated by the framework that you would see in production (with debug mode disabled). You may add additional search paths for code snippets by specifying
codeSearchPaths. Keep in mind that finding code snippets is an imperfect art (there's a decent amount of guess work involved since the compiled Java byte code available at runtime does not contain all of the information available in the source code). - Enables displaying template errors in-browser
- Disables all caching of static files (both server-side and client-side)
- Disables all caching of template files
- Enables an interactive in-browser route overview on the configured
debugRouteMapPath
Please keep in mind that errors are always logged regardless of whether or not debug mode is enabled.
You may use debug mode when deployed to a JAR. You will not be able to reload code when deployed to a JAR, but you will still be able to get stack traces (though note the code snippets will be absent unless you correctly configure projectRootPath or package the source files into the JAR).
An in-browser debug stack trace.
The in-browser route overview.
Code Hot-Swapping
The ability to reload code changes without restarting the web server is one of Lightning's most powerful features. This feature brings the save-and-refresh style development that has made languages like PHP and Python popular for web development to Java. In order to use this feature, you will need to enable debug mode and configure autoReloadPrefixes. To make best use of this feature, you will want to use an IDE or build process that automatically recompiles Java class files when you save code changes. Eclipse and IntelliJ both support this functionality.
autoReloadPrefixes specifies a list of package prefixes. Java code in packages beginning with these prefixes is assumed to be safe to reload on each incoming request. Java code in packages not beginning with these prefixes will not be reloaded on each incoming request - instead, a version of the code in these packages captured near JVM start-up time will be used for all requests.
Understanding Class Loading and Limitations
Each .java code file is compiled into one or more .class files (one per Java class). Each .class file contains the metadata and byte code for a single Java class that can be loaded and executed by a Java Virtual Machine (JVM).
Each class is loaded into memory by the JVM through a java.lang.ClassLoader the first time that it is referenced by byte code execution on the JVM. The code for a class is fixed (snapshotted) at the time it is loaded into memory by a class loader. Once created, these snapshots cannot be changed. Each java.lang.Class maintains a reference to the ClassLoader that loaded it into memory (e.g. MyClass.class.getClassLoader()). The default ClassLoader (ClassLoader.getSystemClassLoader()) in the JVM simply looks in the environment class path (specified in command line via java -cp) for the corresponding .class file on disk and loads it into memory. Static initialization of a class (static variables and static { ... } blocks) occurs at the time the class is loaded into memory.
It is possible to have more than one ClassLoader active in the JVM at a time. In fact, by creating a new ClassLoader instance after making code changes, we can obtain a newer (more recent) snapshot of the code for a class by invoking loadClass manually on the new ClassLoader instance.
To fully understand class loading, it is critical to understand a few things:
- For each
ClassLoader, subsequent calls toloadClasswith the same class name must return the sameClasssnapshot (instance) that previous calls returned - For each
ClassLoader, whenloadClassis invoked with a class name that has not yet been observed by thatClassLoader, theClassLoadermay either load a new snapshot of theClassfrom disk or delegate to a snapshot (instance) of theClasscreated by a differentClassLoader. ClassLoaders do not replace code that was previously loaded, but may instead elect to create a new snapshot (instance) of the sameClass. Thus, there may exist many distinct, type-incompatibleClasses with the same canonical name loaded into the JVM at the same time (up to one instance perClassLoader).- When the JVM encounters a reference to a class that has not yet been loaded by the same class loader that was used to load the code containing the reference,
loadClassis invoked on that class loader to obtain a snapshot of the reqiured class (possibly from disk) before continuing execution.
This is how Lightning implements automatic code reloading - not through replacement, by loading and executing newer snapshots of the code. For each incoming request, Lightning creates a new class loader which acquires new snapshots for only the classes contained in autoReloadPrefixes.
For the classes not contained in autoReloadPrefixes, the new class loader delegates to loadClass on the system class loader. This means that at most one snapshot will exist for classes designated as non-reloadable. Further, static initialization will occur at most once for those classes. In other words, static state will persist through code reloads on classes designated as non-reloadable but will not persist through code reloads on classes designated as reloadable.
In practice, this makes it acceptable for reloadable classes to reference non-reloadable classes as it is assumed that the code for non-reloadable classes will not change during the lifetime of the JVM. On the other hand, it is not recommended for non-reloadable classes to reference reloadable classes since that reference will be fixed to the snapshot captured by the system class loader - a snapshot that will not be updated until the JVM is restarted.
Our recommendation is to enable code hot-swapping for all of your application code except:
- The class containing your
mainmethod (the launcher) - Any classes which are dependency injected
- Any classes which are referenced by non-reloadable code
- Any classes defined by Lightning (
lightning.*) or its dependencies - Any classes which cannot be modified during runtime (e.g. Maven dependencies)
NOTE: Reloading dependency-injectable classes is problematic because, for example, InjectorModule::bindClassToInstance called by your launcher binds the Class object loaded by the system class loader to an instance of that class with the code snapshot created by the system class loader. If that class is marked as reloadable, then, when your reloadable code wishes to inject an instance of that class, the reloadable code is not referencing the version of the class loaded by the system class loader, but a version loaded by a more recently created class loader. Even though that type and the type for which you installed the dependency injection binding have the same canonical name, the JVM treats them as distinct types referring to different snapshots of the code. Therefore, they are not type compatible. Consequently, Lightning's dependency injector will be unable to resolve an object for that parameter and will throw an exception at runtime.
Logging
Lightning uses SLF4J for logging implemented by logback.
We recommend using logback to configure SLF4J to display logs in your console. A simple way to achieve this is adding a logback.xml file to your project classpath. We recommend setting the logging level to INFO for lightning classes and DEBUG for your classes.
<?xml version="1.0" encoding="UTF-8"?>
<configuration>
  <appender name="STDOUT" class="ch.qos.logback.core.ConsoleAppender">
    <encoder>
      <pattern>%d{HH:mm:ss.SSS} [%thread] %-5level %logger{5} - %msg%n</pattern>
    </encoder>
  </appender>
  <logger name="myapp" level="DEBUG" />
  <logger name="lightning" level="INFO" />
  <root level="WARN">
    <appender-ref ref="STDOUT" />
  </root>
</configuration>
Dependency Injection
Lightning allows you to inject custom dependencies into most areas of the framework. This includes exception handlers, route handlers, web sockets, filters, initializers, finalizers, controller constructors - almost any method or constructor that is invoked by the framework.
To configure dependency injection, you must build an InjectorModule and pass the module to Lightning::launch in your launcher.
An InjectorModule allows you to specifies objects that you would like to be injectable. You may specify injections either by (a) their type, (b) the presence of a custom annotation on a parameter, or (c) the presence of a @Inject(name) annotation on the parameter. An example of configuring each of the types of injection is below:
import lightning.config.Config;
import lightning.inject.InjectorModule;
import lightning.Lightning;

class AppLauncher {
  public static void main(String[] args) throws Exception {
    Config config = ...;
    InjectorModule injector = new InjectorModule();
    injector.bindClassToInstance(MyDependency.class, new MyDependency());
    injector.bindNameToInstance("MyDependency", new MyDependency());
    injector.bindAnnotationToInstance(MyAnnotation.class, new MyDependency());
    (new LightningServer(config, injector)).start().join();
  }
}
You may utilize the injected dependencies by inserting them as arguments to any injectable constructor or method. An example is below:
import lightning.ann.*;

@Controller
public final class MyController {
  @Route(path="/a", method={GET})
  public void handleA(MyDependency dep) throws Exception {
    // dep is the instance bound via bindClassToInstance.
  }

  @Route(path="/b", method={GET})
  public void handleB(@MyAnnotation MyDependency dep) throws Exception {
    // dep is the instance bound via bindAnnotationToInstance.
  }

  @Route(path="/c", method={GET})
  public void handleC(@Inject("MyDependency") MyDependency dep) throws Exception {
    // dep is the instance bound via bindNameToInstance.
  }
}
In addition to custom dependency injection, Lightning will automatically configure dependency injection for global framework types (like Config) and request-specific types where applicable (like Request and Response).
It is not possible to inject custom request-specific objects; only global objects can be injected at this time. If you need request-specific objects, inject a thread-safe factory or ThreadLocal factory that produces those objects.
There's no limit to how many injectable arguments a method can have so long as each argument can be resolved by the dependency injector. The framework will throw an exception if it encounters a method for which it cannot resolve all parameters.
It is not possible to dependency inject instances of classes whose code is flagged to automatically reload while running in debug mode.
Framework-Provided Injectable Types
The follow global objects are available for dependency injection:
lightning.config.Config (equivalent to invoking config()) |
lightning.mail.Mailer (equivalent to invoking mail()) |
lightning.templates.TemplateEngine |
lightning.cache.Cache (equivalent to invoking cache()) |
lightning.json.JsonService |
lightning.db.MySQLDatabaseProvider (connection pool, only if configured) |
Any types you install in the InjectorModule passed to Lightning by your launcher |
The following request-specific objects are available for dependency injection (where applicable):
lightning.http.Request (equivalent to invoking request()) |
lightning.http.Response (equivalent to invoking response()) |
lightning.sessions.Session (equivalent to invoking session()) |
lightning.mvc.Validator (equivalent to invoking validator()) |
lightning.mvc.URLGenerator (equivalent to invoking url()) |
lightning.groups.Groups (equivalent to invoking groups()) |
lightning.users.Users (equivalent to invoking users()) |
lightning.users.User (equivalent to invoking user()) |
lightning.db.MySQLDatabase (equivalent to invoking db()) |
lightning.mvc.HandlerContext (instance version of lightning.server.Context) |
lightning.websockets.WebSocketHandlerContext (instance version of lightning.websockets.WebSocketContext) |
javax.servlet.http.HttpServletRequest (equivalent to invoking request().raw()) |
javax.servlet.http.HttpServletResponse (equivalent to invoking response().raw()) |
lightning.cache.Cache (equivalent to invoking cache()) |
org.eclipse.jetty.websocket.servlet.ServletUpgradeRequest (only in Web Sockets) |
org.eclipse.jetty.websocket.servlet.ServletUpgradeResponse (only in Web Sockets) |
Query/Route Parameter Injection
You may annotate a parameter with @QParam(name) to inject the value of the query parameter with the given name. Similarly, you may annotate a parameter with @RParam(name) to inject the value of the route parameter with the given name. The annotated parameter must have type Param, String, int/Integer, long/Long, double/Double, or float/Float. The framework will automatically attempt to convert the provided parameter to the given type. If a conversion cannot be performed or if the query/route parameter is not present, a BadRequestException will be thrown.
Life Cycle, Threading, & Context
Lightning uses a thread-per-request model. For each incoming HTTP request or web socket event, a thread is allocated from the server thread pool to service that request/event to completion.
A HTTP request will be allocated only a single thread throughout it's lifetime. Thus, you may safely use the static methods defined on lightning.server.Context to access resources allocated to the incoming request in a thread-safe manner.
The allocated thread is released back into the pool upon returning from the request or event handler, whether normally or exceptionally, after the framework has completed any neccesary finalizing actions (such as rendering a template or error page).
The general life-cycle for an incoming HTTP request is:
- Allocate a thread to the request
- Match the request to a route
- Invoke any path-based before filters
- Allocate a new controller instance
- Invoke initializers on the controller
- Invoke the matched controller method
- Invoke any finalizers on the controller
- Finalize the response and clean-up resources
- Release the thread back into the pool
Invoking halt() is a simple way to skip to step (8) from any previous step in the process. Similarly, if an exception is thrown anywhere in the process, the framework will skip to step (8) and the finalizing action will instead be to render an error page (or invoke a custom exception handler if installed).
Please keep in mind that async request handlers do not follow these semantics but, instead, conform to the semantics specified by the Java Servlet API for asynchronous handlers. In particular, resources allocated to the request are not cleaned up upon returning from the handler, but will instead be cleaned up at a later point in time when the AsyncContext is closed.
Controllers
A controller is simply a class that can handle incoming HTTP requests. All controllers must be annotated with (or have a parent annotated with) @Controller and must be located within the scan prefixes specified in the configuration provided to Lightning.
Controller classes must be declared public and may have up to one public constructor. A controller's constructor is injectable.
Controllers may have initializers (methods annotated with @Initializer), finalizers (methods annotated with @Finalizer), and routes (methods annotated with @Route). Initializers, finalizers, and routes are all injectable.
When an incoming request matches a route specified on a controller, a new instance of the controller class is allocated. All initializers are invoked by the controller, followed by the matched route method, followed by all finalizers.
Initializers and finalizers are inherited by child classes. If a controller has multiple initializers/finalizers, the order in which they execute is undefined.
Initializers must be public, must return void, and may throw exceptions. If an initializer throws an exception, further processing of the request is halted (including any unexecuted initializers and the matched route - finalizers still execute).
Finalizers must be public, must return void, and may throw exceptions. All finalizers will always execute. Finalizers serve the purpose of destructors and may be reliably used for resource clean-up. Finalizer exceptions are suppressed and will only be visible via the SLF4J log.
import lightning.ann.*;
import static lightning.enums.HTTPMethod.*;
import static lightning.server.Context.*;

@Controller
public class MyController {
  @Initializer
  public void init() {
    // Save any references needed via dependency injection.
  }

  @Finalizer
  public void finalize() {
    // Clean up any allocated resources.
  }

  @Route(path="/a", methods={GET})
  public void handleRouteA() throws Exception {
    response().write("A");
  }

  @Route(path="/b", methods={GET})
  public void handleRouteB() throws Exception {
    response().write("B");
  }
}
Routing
Pre-Requisite Article: Controllers
A route specifies particular code that should execute when the path and method of an incoming HTTP request matches those specified by the route. In Lightning, routes are specified by annotating public instance methods on Controllers with the @Route annotation.
Routes will automatically be installed based on the presence of the annotations and can safely be automatically reloaded in debug mode. The path matcher will attempt to match paths to static files before trying to match routes.
Routing Path Format
Routing paths may contain parameters and/or wildcards.
A parameter matches a single path segment. Parameters are indicated by prefixing a path segment with :. The remaining portion of the path segment after the : specifies the parameter's name. Paths may have zero or more parameters.
A wildcard matches one or more path segments. Wildcards are indicated by setting a path segment to *. Wildcards may only be present in the last segment in the provided path. Thus, paths may have zero or one wildcard.
Here are some valid example routing paths:
//my/path//u/:username/r/:subreddit/t/:topic/c/:comment/account/**(matches everything)
Wildcards and parameters for the matched route will be exposed on the Request object.
Routing Conflicts & Resolution
Routing conflicts are allowed in cases where the set of matched paths is not entirely overlapping. For example, routes for both * and /a/b are allowed (on the same HTTP method). Routes for both /:a/:b and /:b/:a are not. The presence of conflicting routes will prevent server start-up and display an error in terminal.
Routes are implemented using a bastardized version of a radix tree. Routing is O(n) with respect to the number of characters in the request path regardless of the number of routes installed.
Routes are resolved by crawling the routing radix tree by path segments searching for a match with priority given to exact matches, then parametric matches, then wildcard matches.
As a concrete example, consider a server with the following set of routes installed:
//something/*/:something/u/:something/u/*/z/:something
For the above routes, the given request URLs will be matched as follows:
| Request Path | Route Pattern |
|---|---|
/ |
/ |
/something |
/something |
/anything |
/:something |
/anything/more |
/* |
/u |
/:something |
/u/h |
/u/:something |
/u/h/z |
/u/* |
/z/h/u |
/* |
Route Handlers
Route handlers must be public, instance methods defined on a @Controller located within the scan prefixes specified in Lightning's config. Route handlers must be annotated with @Route which specifies the path(s) and method(s) for which the handler will be invoked. A single method may be annotated with @Route multiple times.
A route handler may return a value. If a route handler chooses to return a value, the framework will take an action using the return value:
| Return Type | Framework Action |
|---|---|
void |
No Action. |
null |
No Action. |
String |
Given string will be written to response body as HTML. |
ModelAndView |
Given model and view will be rendered to response body as HTML. |
File |
Given file will be served as if it were a static file. |
| Any other type |
IF THE HANDLER IS ANNOTATED WITH @Json:Returned value will be JSONified and written to response IF THE HANDLER IS ANNOTATED WITH @Template(name):Returned value will be used as view model to render template with given name to the response OTHERWISE: An exception will be thrown by the framework (by default, an internal server error). |
Route handlers may throw exceptions. The framework will catch any thrown exceptions and handle them.
Route handlers are injectable with both request-specific and global objects and therefore may accept any number of injectable arguments.
During the execution of a route handler, the value of any matched parameters and wildcards will be available on the request().
Path-Based Filters
You may specify code snippets that execute before route handlers on certain path patterns.
An example path-based filter which filters unauthenticated requests follows:
import lightning.ann.Before;
import lightning.http.AccessViolationException;
import lightning.http.NotAuthorizedException;

import static lightning.enums.FilterPriority.*;
import static lightning.enums.HTTPMethod.*;
import static lightning.server.Context.*;

public final class AccessControlFilters {
  @Before(path="/admin/*", methods={GET, POST}, priority=HIGH)
  public static void adminFilter() throws Exception {
    if (!user().hasPrivilege(Privilege.ADMIN)) {
      // AccessViolationException triggers an HTTP 403 Forbidden page
      // by default (unless you add a custom exception handler).
      throw new AccessViolationException();
    }
  }

  @Before(path="/admin/*", methods={GET, POST}, priority=HIGHEST)
  @Before(path="/account/*", methods={GET, POST}, priority=HIGHEST)
  public static void authFilter() throws Exception {
    if (!auth().isLoggedIn()) {
      // NotAuthorizedException triggers an HTTP 401 Unauthorized page
      // by default (unless you add a custom exception handler).
      throw new NotAuthorizedException();
    }
  }
}
Please keep in mind...
- Path-based filters must be defined on classes within the scan prefixes specified in the configuration provided to Lightning
- A filter method may be annotated with
@Beforemultiple times - You may control the order in which filters execute by changing the priority in the annotation. Filters with higher priority will execute first. Filters with the same priority may execute in any order.
- Path-based filter methods are injectable with both global and request-specific objects
- Path-based filters can safely use
lightning.server.Context - Path-based filters will only execute if the given method and path also match a route. They will not execute for static files or not founds.
- Path-based filters can take advantage of both wildcard paths and parameterized paths (same path format as routes). The parameters and wildcards will be available on the
request()within the filter function. - Filter matching is highly performant (porportional mostly to the length of the request path and the number of matched filters).
- Path-based filters may prevent further request processing by invoking
halt()or throwing an exception (see Life Cycle).
For more information about path-based filters, see @Before.
Exception Handlers
You may specify code that should execute when a route handler or filter throws a Throwable of a given type. The exception handler will also match all subclasses of the given type for which a more specific handler is not installed. For example, installing an exception handler for Throwable.class will catch every exception.
When writing exception handlers, please keep in mind that the framework does not buffer output unless you explicitly enable output buffering in your configuration. Thus, depending on how your application is written, HTTP headers and some of the request body may already have been sent to the client before an exception is thrown and the corresponding exception handler is invoked (for example, if a controller throws an exception in the middle of its execution).
An exception handler is specified by annotating a public static method on a class located within the scan prefixes specified in your configuration with @Exceptionhandler. Exception handlers must return void but may accept any number of injectable (global and request-specific) arguments. In addition, the causing exception will be dependency-injectable. Exception handlers may throw exceptions. If an exception handler throws an exception, the default framework exception handler will be executed.
import lightning.ann.*;
import lightning.http.*;
import static lightning.server.Context.*;

// This class must be defined in the scan prefixes in your config.
public final class ExampleExceptionHandler {
  // Specify that this method performs exception handling for the given exception type
  // (and all subclasses thereof unless a more specific exception handler is installed
  // for a subclass).
  @ExceptionHandler(NotFoundException.class)
  public static void handleException(NotFoundException e) throws Exception {
    response().status(404);
    response().write("404 Not Found");
    halt();
  }
}
Things to keep in mind:
- Attempting to install multiple exception handlers for the same exception type will prevent server start-up
- Exception handlers may be used to log information or to render an error page
- Exception handlers may re-throw the causing exception to trigger the default exception handler
- Exception handlers may be used to replace framework error pages
- Exceptions are always logged (even if you don't install a handler)
- Exception handlers may use
lightning.server.Context - Exception handlers should re-throw the exception when debug mode is configured to pass the exception to the built-in exception handler which renders the in-browser stack traces (if you do not do this, you will not get stack traces for the registered exception type)
Custom Error Pages
Pre-Requisite Article: Exception Handlers
Lightning includes built-in exceptions that are thrown when certain errors occur and ships with default handlers for these exceptions. For example, lightning.http.NotFoundException is thrown whenever a request path does not match either a route/static file or when a controller directly throws a NotFoundException. The default exception handler for NotFoundException renders a generic 404 Not Found page. A full list of built-in exceptions and their default handler actions can be found below.
All other exceptions (e.g. custom exceptions) are handled by a built-in exception handler for Throwable.class which generates a very generic 500 Internal Server Error page (in production) or shows the debug stack trace if debug mode is configured.
You may override the framework default error pages by adding exception handlers for all of the built-in exceptions and a catch-all handler for Throwable.class that renders a generic error page.
Recommendation: All of your non-HTTP exception handlers should re-throw the causing exception when debug mode is configured. This will pass the exception to the built-in handler for Throwable.class which will then render the in-browser stack trace. If you do not re-throw the exception when debug mode is enabled, you will not be able to see in-browser stack traces.
The following HTTP exceptions are shipped with Lightning and render generic error pages:
Exception (lightning.http) |
HTTP Code |
|---|---|
AccessViolationException |
403 Forbidden |
BadRequestException |
400 Bad Request |
MethodNotAllowedException |
405 Method Not Allowed |
NotAuthorizedException |
401 Unauthorized |
NotFoundException |
404 Not Found |
NotImplementedException |
501 Not Implemented |
An example of replacing some error pages with your own:
import lightning.ann.*;
import lightning.http.*;
import static lightning.server.Context.*;

public final class CustomExceptionHandler {
  @ExceptionHandler(Throwable.class)
  public static void handleException(Throwable e) throws Exception {
    renderErrorPage(500,
                    'Internal Server Error',
                    'An error occurred servicing your request. Please try again.');
  }

  @ExceptionHandler(NotFoundException.class)
  public static void handleException(NotFoundException e) throws Exception {
    renderErrorPage(404,
                    'Not Found',
                    'The resource you requested does not exist.');
  }

  private static void renderErrorPage(int code, String title, String text) throws Exception {
    if (config().enableDebugMode) {
      throw e; // Re-throw to see stack traces.
    }

    response().status(code);
    render('http_error.ftl', // You need to make this template.
           ImmutableMap.of(
             'code': code,
             'title': title,
             'text': text
           ));
  }
}
Web Sockets
To define a web socket endpoint, you must define a class annotated with
@WebSocket(path) within the scan prefixes you specified in your config. This will cause your class to be set up as a web socket endpoint handler on the given routing path. Within that class, you may define handlers for various events. These events are:
WEBSOCKET_HANDSHAKE- Called upon receiving a web socket upgrade requestWEBSOCKET_CONNECT- Called after a web socket connection is establishedWEBSOCKET_CLOSE- Called when a web socket connection terminatesWEBSOCKET_ERROR- Called when a web socket error occursWEBSOCKET_BINARY_MESSAGE- Called when a binary message is receivedWEBSOCKET_TEXT_MESSAGE- Called when a text message is received
The framework will inform you at start-up if your code is not correct (for example, if you define two handlers for the same event).
package myapp;

import lightning.ann.WebSocket;

@WebSocket(path="/path")
public class MyWebSocket {
  /* ... define your event handlers ... */
}
The life cycle of a web socket connection is as follows:
- The server invokes
WEBSOCKET_HANDSHAKEupon receiving an upgrade request to determine whether or not the connection should be allowed to upgrade. You may also use this event handler to set the selected subprotocol (see RFC 6455). - The server creates a new instance of your handler class for the connection.
- The server invokes
WEBSOCKET_CONNECTwhen the connection is fully established. - The server invokes
WEBSOCKET_TEXT_MESSAGE/WEBSOCKET_BINARY_MESSAGEevent handlers as messages are received. - The server invokes
WEBSOCKET_CLOSEwhen either endpoint terminates the connection.
If at any time an error occurs (or if one of your event handlers throws an Exception), the WEBSOCKET_ERROR handler will be invoked immediately followed by the WEBSOCKET_CLOSE handler.
WEBSOCKET_HANDSHAKE
@OnEvent(EventType.WEBSOCKET_HANDSHAKE)
public static boolean onUpgradeRequest(...) throws Exception
This event handler is called upon receiving an upgrade request but before the upgrade response is sent. Your event handler should return true to accept the connection. If you throw an exception or return false, the upgrade request will be rejected.
This method is dependency-injectable with both global and request-specific objects (see Dependency Injection). In addition to the standard types, ServletUpgradeRequest and ServletUpgradeResponse are injectable (you may use these to read negotiation parameters, perform origin validation, and set the selected subprotocol if needed). You may safely use lightning.server.Context methods in this event handler.
If you do not include this event handler on your class, then all connections will be accepted by default.
Constructors
A web socket handler may have up to one public constructor. That constructor is dependency-injectable with both global and request-specific objects (see Dependency Injection). In addition to the standard types, ServletUpgradeRequest and ServletUpgradeResponse are injectable.
You may safely use lightning.server.Context methods within the constructor, but lightning.websockets.WebSocketContext is not available as the connection has not yet been establsihed.
All request-specific objects will go out of scope after you return from the constructor. You must not save any of these request-specific objects (e.g. Lightning's Session, User, Request, MySQLDatabase) as instance properties on your handler. Instead, you should extract the specific values you need and save those. For example, you might save the value of a cookie or the ID of the authenticated user.
If you need to use templates, mail, json, or a database connection in your web socket handler, use WebSocketHandlerContext in the event handlers (more details below).
If your constructor throws an exception, it will be as if your WEBSOCKET_HANDSHAKE method returned false.
You should not reserve resources in your constructor as there is no guarantee that WEBSOCKET_CONNECT and WEBSOCKET_CLOSE will be executed.
WEBSOCKET_CONNECT
@OnEvent(EventType.WEBSOCKET_CONNECT)
public void onConnect(, ...) throws Exception
This event handler is called when a connection is fully established. It will be invoked at most once for each instance of your handler class that is created. The arguments are dependency-injectable with global object types and WebSocketHandlerContext. You may not use lightning.server.Context methods in this handler, but you may use lightning.websockets.WebSocketContext methods.
WEBSOCKET_CLOSE
@OnEvent(EventType.WEBSOCKET_CLOSE)
public void onClose(int statusCode, String reason, ...) throws Exception
This event handler is called when a connection is terminated. The first two arguments are fixed, but the remaining arguments are dependency-injectable with global object types and WebSocketHandlerContext. You may not use lightning.server.Context methods in this handler, but you may use lightning.websockets.WebSocketContext methods.
This event handler will always be invoked exactly once for each instance of your handler class upon which WEBSOCKET_CONNECT was invoked, regardless of who terminated the connection or why it was terminated. It will still be called if your WEBSOCKET_CONNECT handler throws an exception. The status code may provide insight into why the connection was closed - see RFC 6455.
WEBSOCKET_ERROR
@OnEvent(EventType.WEBSOCKET_ERROR)
public void onError(Throwable error, ...) throws Exception
This event handler is called when one of your other event handlers throws an exception, or when something goes wrong internally within the web socket implementation. The first argument is fixed, but the remaining arguments are dependency-injectable with global object types and WebSocketHandlerContext. You may not use lightning.server.Context methods in this handler, but you may use lightning.websockets.WebSocketContext methods.
You may use the handler to log the error if you wish, but the connection should be considered terminated if this event handler is invoked - WEBSOCKET_CLOSE will always be invoked afterwards.
If you do not define this event handler on your class (recommended), the occurence of an error will simply log the error. See logging for more information.
WEBSOCKET_TEXT_MESSAGE
@OnEvent(EventType.WEBSOCKET_TEXT_MESSAGE)
public void onTextMessage(String message, ...) throws Exception
This event handler is called upon receiving a complete text message. The first argument is fixed, but the remaining arguments are dependency-injectable with global object types and WebSocketHandlerContext. You may not use lightning.server.Context methods in this handler, but you may use lightning.websockets.WebSocketContext methods.
If you do not define this event handler on your class, the reciept of a text message will cause the connection to be terminated with status code 1003 (unsupported data type).
WEBSOCKET_BINARY_MESSAGE
@OnEvent(EventType.WEBSOCKET_BINARY_MESSAGE)
public void onBinaryMessage(byte[] data, int offset, int length, ...) throws Exception
This event handler is called upon receiving a complete binary message. The first three arguments are fixed, but the remaining arguments are dependency-injectable with global object types and WebSocketHandlerContext. You may not use lightning.server.Context methods in this handler, but you may use lightning.websockets.WebSocketContext methods.
If you do not define this event handler on your class, the reciept of a binary message will cause the connection to be terminated with status code 1003 (unsupported data type).
Web Socket Context
You may use the static methods on lightning.websockets.WebSocketContext inside of the event handlers for all web socket events except for WEBSOCKET_HANDSHAKE. These APIs will allow you to manage the connection, send messages, and access various aspects of the framework (like the database connection). These are the web socket equivalents of lightning.server.Context.
Any methods that may safely use WebSocketContext are dependency-injectable with WebSocketHandlerContext (the instance version of the API, much like HandlerContext is to Context).
Debug Mode
A web socket handler's code may be reloaded automatically in debug mode if the class is defined within the autoReloadPrefixes in your configuration.
All incoming web socket connections will always use the latest version of the code at the time the connection is established. If at any point a web socket connection involves a handler running outdated code, the framework will terminate that connection the next time that any web socket event occurs on it. If this happens, the triggering event will be dropped, but the WEBSOCKET_CLOSE handler will still be invoked on the old version of the code to allow for clean-up operations to run. When the client reconnects, they will connect to a handler running the latest version of the code.
The framework guarantees that a remote endpoint will never be allowed to communicate with outdated code. The framework does not, however, terminate existing connections immediately when the code is changed. Instead, the framework waits until the next event on that connection. If no events are occuring on a connection running outdated code, the connection will not be terminated until it times out. To get around this limitation, you may force an immediate reload by refreshing the page in your browser, or you may opt to configure a lower default time out for web socket connections when running in debug mode.
Echo Socket Example
import static lightning.websockets.WebSocketContext.*;

import lightning.ann.OnEvent;
import lightning.ann.WebSocket;
import lightning.enums.EventType;

@WebSocket(path="/echo")
public class EchoWebSocket {
  @OnEvent(EventType.WEBSOCKET_TEXT_MESSAGE)
  public void handleTextMessage(String message) throws Exception {
    sendText(message);
  }

  @OnEvent(EventType.WEBSOCKET_CONNECT)
  public void handleConnect() throws Exception {
    sendText("Hello!");
  }
}
Tips & Tricks
- If you need broadcast functionality, you can save sessions to a static
ConcurrentHashMapin yourWEBSOCKET_CONNECThandler and remove them from the set in yourWEBSOCKET_CLOSEhandler. You can then iterate through the set to broadcast a message (for example, if you are implementing chat room functionality).
Requests
An incoming HTTP request is represented by lightning.http.Request.
import static lightning.server.Context.request;

// List of path segments in the request path
request().segments()

// Access the request path
request().path()

// Return whether or not the request matches a path pattern
// Pattern is in the same format as routing paths
request().matches(pathPattern)

// Returns the complete URL of the request
request().url()

// Returns the request URI
request().uri()

// Returns the content type of the request
request().contentType()

// Returns the HTTP method of the request
request().method()

// Returns the scheme of the request (e.g. HTTP or HTTPS)
request().scheme()

// Returns whether or not the request was encrypted
// Honors load balancer X-Forwarded headers if enabled in config
request().isSecure()

// Returns the host contained in the request
request().host()

// Returns the ip of the remote client
// Honors load balancer X-Forwarded headers if enabled in config
request().ip()

// Properties attached to request:
request().properties()
request().property(name)
request().property(name, value)
request().removeProperty(name)

// Returns names of all route parameters matched
request().routeParams()

// Returns value of parameter with given name
request().routeParam(name)

// Returns the wildcard portion of the path matched
request().wildcardPath()

// Returns the path segments of the wildcard portion of the path matched
request().wildcards()

// Reading unsigned cookies:
// See the doc article on cookies.
request().rawCookies()
request().rawCookie(name)

// Reading query parameters:
request().queryParams()
request().queryParamsExcepting(names)
request().queryParam(name)

// Reading HTTP headers:
request().headers()
request().header(name)

// Processing multipart requests:
// See the doc article on multipart requests.
request().isMultipart()
request().parts()
request().part(name)

// Access raw HttpServletRequest:
request().raw()
Responses
An outgoing HTTP response is represented by lightning.http.Response.
You should treat responses as being unbuffered (unless you configure output buffering). You may mutate any parts of the response header at will before writing anything to the response body. However, once the first byte is written to the response body, the response is considered committed and further attempts to modify parts of the response header will fail as the response header and any bytes written to the body may already have been transmitted across the network (depending upon server load and configured buffer size).
By default, responses are sent with a status of 200 OK and a content-type of text/html; charset=UTF-8. Unless an explicit content-length is specified before the response is committed, the response will be sent with HTTP chunked transfer encoding.
import static lightning.server.Context.request;

// Whether or not some bytes of the response have
// already been committed (written) to the network
response().hasSentHeaders()

// Set the HTTP status code
response().status(status)

// Set the response to a temporary 302 redirect to a URL.
response().redirect(url)

// Set the response to a redirect to a URL with given status code.
response().redirect(url, status)

// Sets the response content type.
response().type(contentType)

// Returns the content type that should be used for a given file extension.
response().typeForFileExtension(ext)

// Returns the content type that should be used for a given file (local path).
response().typeForFilePath(path)

// Writing output:
response().write(text)
response().writef(format, ...args)
response().writer()
response().outputStream()

// Setting headers:
response().header(name, value)

// Setting raw cookies:
// See doc article on cookies.
response().rawCookie(name, value, path, maxAgeSec, httpOnly, secureOnly)

// Access to raw HTTPServletResponse:
response().raw()
Type-Safe Parameters
A huge benefit of developing web applications in Java over other languages like PHP or Python is type safety. Unfortunately, ensuring type safety can be difficult when dealing with values whose types cannnot be known at compile time. In particular, web developers will commonly encounter values that are user-provided or deserialized from external storage systems. To enable type safety in these situations, Lightning provides the Param and ObjectParam value wrapper classes.
You may have noticed that, throughout the Lightning APIs, most methods that return a user-provided string value (such as request().queryParam(name)) return an instance of lightning.mvc.Param instead of a nullable String or Optional<String>. Similarly, most methods that return an object value of unknown type (such as session().get(key)) return an instance of lightning.mvc.ObjectParam instead of a nullable Object or Optional<Object>.
Let's consider a query parameter (form field) for which you want to accept an integer. In Lightning, you can conveniently write:
import static lightning.server.Context.*;
int age = queryParam("age").intValue();
If the user-provided value does not exist or is not an integer, then invoking intValue() throws a BadRequestException preventing further execution of the handler and invoking the exception handler for BadRequestException (by default, the handler renders an HTTP 400 error page).
Key Idea: Using intValue() to catch user input errors is not the most user-friendly way of type checking user-provided values. Typically, you would want to use a validator to re-render the form with error messages. However, intValue() does ensure that the given value is always an integer thus preventing you from accidently storing incorrect data types to a database in any situation. This is particularly important if you are using a database that is not well structured (e.g. a no-SQL JSON document store such as RethinkDB or MongoDB).
Param provides many other convenience methods for dealing with array input, checkboxes, enums, doubles, and more. See Param.java for the complete API.
ObjectParam provides convenience methods for a casting an instance of Object to a more specific type such as List<String>. If the conversion cannot be formed, a TypeConversionException is thrown which will invoke the corresponding exception handler (by default, this renders a 500 Internal Server Error page). This is convenient for retrieving serialized values stored in the cache or session. See ObjectParam.java for the complete API.
For example, to retrieve a list of strings stored on a user's session or create a new empty list if that key does not exist or if the value for that key is not of the expected type:
List<String> data = session().get("key").listOption(String.class).or(new ArrayList<String>());
Templates
In Lightning, a template is rendered from a view name and a view model. Templates produce some sort of text output (typically HTML). The format of the view model is dependent upon the template engine you configure.
By default, Lightning utilizes the FreeMarker Template Engine to render views. With FreeMarker, view names are simply the name of the template file (relative to the template files path specified in your config) and view models are simply a map of variable names to their respective values. For template language syntax and features, refer to the FreeMarker Documentation.
You must configure a template files directory to use templates. You may configure a different template engine if you do not like FreeMarker. For information on configuring templates, see Configuration.
SECURITY ADVISORY: The template engine you are using may not automatically escape HTML characters (including the default FreeMarker template engine). You should take precautions to protect your application against XSS attacks. FreeMarker provides auto-escaping functionality for this purpose.
Templates may be rendered a variety of different ways:
Option 1
You may return the view model from a route handler annotated with @Template(name). This method is preferred when you know the name of the template at compile-time.
@Controller
public final class MyTemplateController {
  @Route(path="/", methods={GET})
  @Template("view.ftl")
  public Map<String, ?> handleView() throws Exception {
    return ImmutableMap.of("key1", "value1", "key2", "value2");
  }
}
Option 2
You may return an instance of ModelAndView from a route handler annotated with @Template. This method is preferred when you do not know the name of the template at compile-time.
@Controller
public final class MyTemplateController {
  @Route(path="/", methods={GET})
  @Template
  public ModelAndView handleView() throws Exception {
    return modelAndView("view.ftl",
                        ImmutableMap.of("key1", "value1",
                                        "key2", "value2"));
  }
}
Option 3
You may use the template APIs (on lightning.server.Context):
// To create a ModelAndView:
modelAndView(viewName, viewModel)

// To render a model and view to a String:
renderToString(modelAndView)
renderToString(viewName, viewModel)

// To render a model and view to the response body:
render(modelAndView)
render(viewName, viewModel)
JSON
Lightning includes built-in support for parsing and generating JSON. By default, Lightning uses gson. You may configure Lightning to use a different JSON library if you prefer.
import static lightning.server.Context.*;

// Parse JSON from the value of a query parameter.
parseJsonFromParam(queryParamName, clazz)
parseJsonFromParam(queryParamName, clazz, policy)

// Parse JSON from the request body.
parseJson(clazz)
parseJson(clazz, policy)

// Parse JSON from a String.
parseJson(json, clazz)
parseJson(json, clazz, policy)

// Convert a Java object to a JSON string.
toJson(object)
toJson(object, policy)

// Set headers and write a Java object to response as JSON.
sendJson(object)
sendJson(object, prefix)
sendJson(object, policy)
sendJson(object, prefix, policy)
You may indicate that a route handler returns an object that should be JSONified using the @Json annotation. The framework will automatically convert the object to JSON and set headers accordingly as if you had invoked sendJson.
@Controller
public final class ExampleJsonController {
  @Route(path="/", methods={GET})
  @Json
  public Object handleRequest() throws Exception {
    return ImmutableMap.of("key1", "value1", "key2", "value2");
  }
}
The Lightning JSON APIs optionally allow you to specify an XSSI prefix (to mitigate XSSI attacks) and a field name conversion policy between Java objects and JSON.
@Controller
public final class ExampleJsonInputController {
  public static class MyType {}

  @Route(path="/", methods={POST})
  // Specifies to parse JSON contained in request body to MyType
  // and dependency-inject the data into the method. If request
  // body is not present/not valid json/not of type MyType,
  // a BadRequestException is thrown.
  @JsonInput(type=MyType.class)
  public void handleRequest(MyType data) throws Exception {
    doThingsWithData(data);
  }
}
Form Validation
Each request has an attached Validator that can be used to perform form (query parameter) validation on that request. The general usage of validators follows:
import static lightning.server.Context.*;

// Specify what you want to validate:
validate("agreement").isChecked();
validate("email").isEmail().isNotEmpty();
validate("year").isNumberBetween(2000, 2100);
validate("file").isFileSmallerThan(1024);
validate("answer").isOneOf("A","B","C","D");

// Check if the constraints you specified hold true for the request:
if (passesValidation()) {
  // If validation succeeds, make changes to the database.
  saveData(request);
  showSuccessPage();
} else {
  // Otherwise, show errors to user (map of query param names to associated error(s)).
  Map<String, String> errors = validator.getErrors();
  showErrorPage(errors);
}
validator()
validator().addError(field, errorMessage)
validator().getErrors()
validator().getErrorOption(field)
validator().getErrorsAsString()
validator().passes() // (aliases passesValidation(), !validator().hasErrors())
validateXsrf(field)
validateXsrf()
validate(field).addError(errorMessage)
validate(field).isEmail()
validate(field).isURL()
validate(field).isPresent()
validate(field).isNotChecked()
validate(field).isChecked()
validate(field).is(requiredValue, errorMessageIfFailed)
validate(field).isShorterThan(chars)
validate(field).isLongerThan(chars)
validate(field).isNotEmpty(chars)
validate(field).isAlpha()
validate(field).isAlphaNumeric()
validate(field).isAlphaNumericWithSpaces()
validate(field).isAlphaWithSpaces()
validate(field).isAlphaNumericDashUnderscore()
validate(field).isLong()
validate(field).isDouble()
validate(field).isPositiveNumber()
validate(field).isPositiveNonZeroNumber()
validate(field).isNumberAtLeast(n)
validate(field).isNumberAtMost(n)
validate(field).isNumberInRange(min, max)
validate(field).isOneOf(list)
validate(field).containsOnly(list)
validate(field).hasNoDuplicates()
validate(field).isNonEmptyFile()
validate(field).isFile()
validate(field).isFileSmallerThan(bytes)
validate(field).isFileOfType(typeList)
validate(field).isFileWithExtension(extList)
validate(field).isEnum(enumType)
validate(field).matches(regex, errorMessageIfFailed)
validate(field).matches(pattern, errorMessageIfFailed)
validate(field).matches(() -> { return true|false; }, errorMessageIfFailed)
URL Generation
Provides assistance with generating absolute URLs to application paths.
import static lightning.server.Context.url;

// Generates the complete (full) URL to a given path (including schema, host, etc).
url().to(path)

// Generates the complete (full) URL to a given path (including schema, host, etc)
// with the given query parameters.
url().to(path, queryParams)
Cookies
Cookies can be used to store transient client (browser) specific data. Cookies can be thought of as a map of variable names to string values. Cookies are stored with the client and are therefore subject to direct viewing, tampering, and sudden deletion.
To ensure the integrity of cookies, Lightning will automatically sign the cookies you set with HMAC SHA256 and verify the signatures before allowing you to read the value of the cookie. This signing and verification process is made completely transparent to you by the Cookies API. This signing process prevents users from forging and modifying cookies, but does not prevent one user from copying another's cookies, sudden deletion of cookies, or disclosure of cookie values. If a cookie's signature cannot be verified, the API will act as if the user did not send that cookie. If you prefer to use raw (unsigned) cookies, you may use the Request and Response rawCookie APIs instead.
Attempting to set a cookie after the response headers have already been committed will throw an exception. You should set all cookies before taking an action that would commit the response or enable output buffering in your configuration.
Cookies are sent with HTTP ONLY unless specified otherwise in an API invocation. This flag prevents the value of the cookie from being tampered with or read by JavaScript code and reduces the surface for XSS attacks.
Cookies are sent with SECURE ONLY if SSL is enabled in config unless specified otherwise in an API invocation. This flag prevents the contents of the cookie from being accidently disclosed over an insecure connection.
To utilize the cookies API, you must configure an HMAC private key.
import static lightning.server.Context.cookies;

cookies().set(name, value)
cookies().set(name, value, path, maxAgeSec, httpOnly)
cookies().set(name, value, path, maxAgeSec)
cookies().set(name, value, maxAgeSec)
cookies().has(name)
cookies().get(name)
cookies().delete(name)
cookies().all()
cookies().asMap()
Sessions
Sessions can be used to store transient client (browser) specific data in a server-side data storage system. Conceptually, sessions can be thought of as a map of variable names to values. You may store any type of java.io.Serializable object as a value in the session store. Sessions can not be used to store persistent data as either the storage sytem or user may elect to terminate the session at any point in time.
Sessions serve a purpose similar to cookies but, unlike cookies, users cannot directly view or alter the information stored in their session and the size of each value is not limited. You should prefer using cookies where safe and possible since they are impose no server-side overhead.
The storage system used to back sessions is configurable. Sessions are linked between the storage system and the user's browser by an HMAC-signed cookie containing a random session identifier. The data storage system remembers only a hash of the session identifier. The framework does not provide protection against session fixation attacks; you should invoke regenerateId() in your application logic when neccessary to mitigate these types of attacks (note the Auth login API will automatically do this).
Sessions are lazy-loaded - no calls to underlying storage will be made unless a controller invokes a method on session(). Sessions are automatically saved if they have been modified when you return from a route handler. Session saves may fail if the response has already been committed prior to returning from a route handler since the session cookie cannot be set - to get around this, manually invoke save() before taking an action that could commit the response or enable output buffering in your configuration.
import static lightning.server.Context.session;

// Getting and setting values:
session().keys()
session().set(key, value)
session().get(key)
session().forget(key)
session().has(key)
session().asMap()

// Getting the XSRF token:
session().xsrfToken()

// Change the XSRF token and get the new one:
session().newXsrfToken()

// Change the session identifier:
session().regenerateId()

// Dirty sessions are automatically saved when you return from handler.
// To force immediate save of session, you may invoke this.
session().save()
Users, Groups, & Permissions
Users, Groups, Permissions, and Auth are all backed by storage drivers that must be configured.
Users are Lightning's internal representation of user management.
import static lightning.server.Context.*;

// --- Methods for interacting with users in aggregate ---

// Returns the user with given id (if exists).
users().getById(id)

// Returns the user with given username (if exists).
users().getByName(username)

// Returns the user with given email (if exists).
users().getByEmail(email)

// Returns an iterator over all user accounts.
// This iterator efficiently fetches from the underlying storage system in chunks.
users().getAll()

// Creates and returns a new user with given username, email, and password.
users().create(username, email, password)

// Deletes a user.
// Only deletes data stored by Lightning.
users().delete(user)

// --- Methods for interating with an individual user ---

User user = /* .. obtain using one of above methods .. */;
user.emailIsVerified()
user.setEmailIsVerified(isVerified)
user.getToken()
user.setToken(token)
user.getId()
user.getUserName()
user.getEmail()
user.setEmail(email)
user.isBanned()
user.getBanExpiry()
user.banUntil(timestamp)
user.setPassword(password)
user.checkPassword(password)

// Users can be used as a key-value store.
// String keys and any type of java.io.Serializable value are supported.
user.getProperties()
user.hasProperty(key)
user.setProperty(key, value)
user.deleteProperty(key)
user.getProperty(key)
user.getPropertyCount()

// These methods all take into account the set union of the permission set
// of the individual user and all groups the user is a member of.
user.hasPrivilege(pid)
user.hasPrivilegeOnUser(pid)
user.grantPrivilege(pid)
user.revokePrivilege(pid)
user.getPrivilegeSet()
user.getPrivileges()
user.getPrivilegesOnUser()
user.hasPrivileges(pids)
user.hasPrivilegesOnUser(pids)
user.grantPrivileges(pids)
user.revokePrivileges(pids)

// Users may be a member of one or more permission groups.
user.getGroups()

// User changes are not pushed to the underlying data store until save() is invoked.
// save() may fail if changes violate constraints (e.g. usernames must be unique).
user.save()
Groups simply aggregate together a set of users. Users may be members of more than one group. Permissions may be set on groups, and members of the group will inherit any permissions granted to the group.
// --- Methods for interacting with groups in aggregate --
groups().get(id)
groups().getByName(name)
groups().getAll()
groups().create(name)
groups().delete(group)

// --- Methods for interacting with an individual group --
Group group = /* ... obtain using one of above methods ... */;
group.getId()
group.getName()
group.setName(name)
group.getPrivileges()
group.hasPrivilege(pid)
group.grantPrivilege(pid)
group.revokePrivilege(pid)
group.hasPrivileges(pids)
group.grantPrivileges(pids)
group.revokePrivileges(pids)
group.addUser(user)
group.removeUser(user)
group.hasUser(user)
group.getUserIds()
group.hasUsers(users)
group.addUsers(users)
group.removeUsers(users)
Permissions (or Privileges) are simply integers. The meaning of these integers is undefined by the framework - it is up to you to decide what each possible value represents and enforce them. Our recommendation is to define an enum of all Permissions and use the ordinals.
// Define your own class:
public enum Permissions {
  CREATE_USER,
  MANAGE_USERS,
  POST_ANNOUNCEMENTS,
  /* ... etc ... */;
}

// Then you can use the ordinal for a privilege id. For example:
if (user().hasPrivilege(Permissions.MANAGE_USERS.ordinal())) {
  // ... allow access ...
}
Authentication
You must configure a storage driver for users, groups, and auth to use these APIs. The authentication APIs provide a way for securely handling user authentication and are configured to be resilient against all known forms of attack by default if you deploy using SSL. The authentication API uses a cookie to link the client (browser) to an authentication session in your persistent data store.
Authentication sessions are typically short-lived (inactivity timeout of one hour unless configured differently). Authentication sessions are long-lived (inactivity timeout of two weeks unless configured differently) only if the persistent flag is set.
import static lightning.server.Context.*;

// Returns whether or not a user is authenticated.
isLoggedIn() // (alias auth().isLoggedIn())

// Returns currently authenticated user.
// Throws NotAuthorizedException if not authenticated.
user() // (alias auth().user())

// Logs out currently authenticated user (if any).
// Terminates all persistent auth tokens on the client if requested.
// NOTE: The user will not truly be logged out unless removePersistentTokens=true.
auth().logout(removePersistentTokens)

// Logs client in as given user (optionally persistent).
// Will indicate user has entered their password recently unless isFromToken.
auth().loginAs(user, isPersistent, isFromToken)

// Attempts to authenticate using given username and password.
// Optionally makes the authentication session persistent.
// Optionally accepts extra info (passed to the underlying auth driver) - usually null.
// This method will check security measures (such as throttling).
// Will indicate the user has entered their password recently if successful.
// Throws an AuthException if unsuccessful.
auth().attempt(username, plaintextPassword, isPersistent, extraInfo)

// Use to manage other sessions logged in to a user's account.
auth().terminateAllSessionsForUser(user)
auth().terminateOtherSessions()

// Use to check the password of the currently logged-in user.
// Throws exception if not authenticated.
// Will indicate user has entered their password recently if successful.
// Subject to security measures such as throttling.
auth().checkPassword(plaintextPasword)

// Use to check that the user has confirmed their identity recently by entering their
// actual password.
// Useful to restrict access to sensitive data (e.g. billing info).
// This can be used to prevent someone who walks up to a machine with an already logged in user
// from making changes to that user's account without knowing their password. You can configure
// a timeout period.
auth().hasEnteredPasswordRecently()
Route handlers may be annotated with @RequireAuth to filter unauthenticated requests.
By default, we utilize a SQL database driver to store users, sessions, and authentication. You may configure different storage drivers if you wish. To use the provided database storage driver, you simply need to import the schema into your database.
Our APIs provide convenience methods for handling authentication, sessions, and user data. However, you'll still need to make your own log in, log out, and registration controllers. We have included some skeletons for your convenience.
public final class AuthController {
  @Route(path="/login", methods={GET})
  @Template('login.ftl')
  public Object handleLoginGET() throws Exception {
    // Display your login form.
    return ImmutableMap.of(); // The view model.
  }

  @Route(path="/register", methods={GET})
  @Template('register.ftl')
  public Object handleRegisterGET() throws Exception {
    // Display your registration form.
    return ImmutableMap.of(); // The view model.
  }

  @Route(path="/logout", methods={GET})
  public void handleLogoutGET() throws Exception {
    if (isLoggedIn()) {
      auth().logout(true);
    }

    redirect(url.to("/"));
  }

  @Route(path="/login", methods={POST})
  @Template('login.ftl')
  public Object handleLoginPOST() throws Exception {
    redirectIfLoggedIn(url.to("/"));

    // Add form validation.
    validate("username").isNotEmpty();
    validaet("password").isNotEmpty();

    try {
      if (passesValidation()) {
        // Delegate to framework authentication.
        String username = queryParam("username").stringValue();
        String password = queryParam("password").stringValue();
        boolean persistent = queryParam("persistent").isChecked();
        auth().attempt(username, password, persistent, null);
        redirect(url().to("/profile"));
      }
    } catch (AuthException e) {
      switch (e.getType()) {
        case NO_USER:
        case INVALID_PASSWORD:
        case INVALID_USERNAME:
        case USER_BANNED:
          validator().addError("username", "Invalid username/password combination.");
          break;
        case IP_THROTTLED:
        case USER_THROTTLED:
          validator().addError("username", "You must wait before trying again.");
          break;
        default:
          throw e; // Re-throw the exception to generate an internal server error.
      }
    }

    // Re-show login page with errors if authentication failed.
    return ImmutableMap.of("errors", validator.getErrors()); // View model for template.
  }

  @Route(path="/register", methods={POST})
  public void handleRegisterPOST() throws Exception {
    // TODO: Add form validation.
    validate("username").isShorterThan(30)
                        .isLongerThan(3)
                        .isAlphaNumeric();
    validate("password").isLongerThan(5)
                        .isShorterThan(100);
    validate("email").isEmail();

     if (passesValidation()) {
      // Create the user account.
      String username = queryParam("username").stringValue();
      String password = queryParam("password").stringValue();
      String email = queryParam("email").stringValue();

      // Note: exception will be thrown on failure (e.g. duplicate username).
      User user = users().create(username, email, password);
      render('register_success.ftl', ImmutableMap.of());
      return;
    }

    // Re-show registration form on error.
    render('register.ftl',
           ImmutableMap.of("errors", validator.getErrors()); // View model for template.
  }
}
You can access the currently authenticated user in any of your controllers by invoking user(). If no user is logged in, a NotAuthorizedException is thrown which generates an HTTP 401 error page. You can check if a user is logged in by invoking isLoggedIn(). Annotating a route with @RequireAuth will filter unauthenticated requests for that route. Alternatively, you may want to look into using path-based filters.
To utilize the email API, you must configure SMTP or the logging driver.
import static lightning.server.Context.mail;

Message message = mail().createMessage();
message.addRecipient(email)
message.addRecipient(email, name)
message.addCC(email)
message.addCC(email, name)
message.addBCC(email)
message.addBCC(email, name)
message.setSubject(subject)
message.setText(text)
message.setText(stream)
message.setHTMLText(text)
message.setHTMLText(stream)
message.addAttachment(fileName, mimeType, inputStream)
message.addAttachment(path)
message.addAttachment(file)
message.addAttachment(fileName, dataSource)

// Sends a message (blocking).
mail().send(message);

// Sends a message asynchronously (fire and forget).
mail().sendAsync(message);
The Mail API does not support retries, queueing, or guarantee delivery. If you need these features, you should utilize your own mailing library. See Using External Tools.
Cache
The cache is a globally-shared transient key-value store meant to be backed by a technology like Memcached or Redis.
The cache API supports String keys and any type of java.io.Serializable object may be stored as a value.
To utilize the cache API, you must configure a cache driver.
import static lightning.server.Context.cache;

cache().get(key, type, () -> { return default; })
cache().get(key, type, () -> { return default; }, expiration)
cache().get(key)
cache().gets(key)
cache().set(key, value)
cache().set(key, value, exiration)
cache().delete(key)
cache().increment(key, amount, initial, expiration)
cache().increment(key, amount, initial)
cache().decrement(key, amount, initial, expiration)
cache().decrement(key, amount, initial)
cache().cas(key, token, value, expiration)
cache().cas(key, token, value)
cache().touch(key, expiration)
cache().touch(key)
cache().clear()
Async Handlers & SSE
Async Handlers
An asynchronous handler alters a request's life cycle enabling it to outlive the invocation of a request handler. You may use this functionality to release the thread reserved for processing the request back into the server thread pool while waiting for a lengthy I/O operation. An example follows:
import lightning.ann.*;
import lightning.mvc.HandlerContext;

import static lightning.enums.HTTPMethod.*;
import static lightning.server.Context.*;

import java.util.concurrent.TimeUnit;

@Controller
public class AsyncController {
  @Route(path="/asyncDemo", methods={GET})
  public void handleRequestAsync() throws Exception {
    // Invoke goAsync to start asynchronous mode.
    // An async context is returned to facilitate this.
    // HandlerContext is the instance version of lightning.server.Context.
    // lightning.server.Context methods ARE NOT SAFE TO USE after going async.
    HandlerContext context = goAsync();

    // You may offload the request processing to another thread or queue it up
    // for some lengthy I/O operation.
    ((new Thread() {
      @Override
      public void run() {
        try {
          for (int i = 0; i < 5; i++) {
            Thread.sleep(TimeUnit.SECONDS.toMillis(1));
            // When you decide you are ready to work on the response, you can
            // use the async context to do so:
            context.response().write("Hello World!\n");
            context.response().flush();
          }
        } catch (Throwable e) {
          // This is the recommended way to handle top-level exceptions as it will
          // log the error and then follow the standard exception handling path.
          context.handleException(e);
        } finally {
          // IMPORTANT: You must close to context when you are finished servicing
          //            the request to avoid leaking resources.
          context.close();
        }
      }
    })).start();

    // Returning releases the thread back into the server thread pool to handle another request.
  }
}
Server-Sent Events (SSE)
It is possible to utilize asynchronous handlers to efficiently emit events to a server-sent event stream. We leave it as an exercise to the reader to implement the infrastructure for handling an SSE endpoint efficiently since it would likely be application-specific. You may find the SSE Specification and Jetty's EventSourceServlet implementation useful.
Multipart & File Uploads
To handle multipart requests, you must configure multipart support and indicate which routes accept multipart requests by annotating them with @Multipart. Multipart requests sent to handlers that are not annotated with @Multipart will be dropped. Request::queryParam and form validators work properly for forms submitted with multipart encoding.
An example of handling a file upload follows:
@Controller
class FileUploadController {
  @Route(path="/upload", methods={POST})
  @Multipart
  public void handleUpload() throws Exception {
    String fileName = request().part("file").getSubmittedFileName();
    long fileSize = request().part("file").getSize();
    InputStream fileContent = request().part("file").getInputStream();
    // ... Validate the file, store its contents, and build the response ...
  }
}
SQL Database Access
Lightning ships convenience functions for accessing a MySQL database through a connection pool. The usage of this functionality is entirely optional. In order to use these APIs, you'll need to configure a database connection under the db property.
MySQLDatabaseProvider) is a thread-safe factory used by worker threads to obtain non-thread-safe database connection objects (MySQLDatabase) for temporary, exclusive use. Connection pools typically maintain a variable-sized pool of connections that workers may lease. If the pool is exhausted, then attempting to lease a connection from the pool will block until one is available. When a worker is finished with a leased connection, it must close() the connection to return it to the pool for re-use. Connection pools are convenient since re-using connections avoids the round trip times needed to set up a new connection. For more information, see Connection Pooling - Wikipedia.
To obtain a thread-unsafe database connection from the connection pool, you may invoke db() (on lightning.server.Context) from within a route handler, filter, or exception handler. The connection you obtain will be reserved for exclusive use by the calling thread from the point at which you first invoke db() until the request is completely handled. Thus, route handlers that do not utilize the database will not consume any resources from the pool and subsequent invocations of db() for the same request will return the same connection. Since the database connection is automatically returned to the pool by the framework, you do not need to close() the connection returned by db() (though it is not harmful to do so). You must still, however, explicitly close any prepared statements or result sets that you create using that connection (Java's try-with-resources blocks are convenient for this).
@WebSocket. See Web Sockets for more information.To use the database with async handlers, you should not invoke
db() - this will reserve the connection until the async context is closed. Instead, you should use the connection pool directly to lease a connection when needed. A reference to the pool can be obtained via dependency injection on MySQLDatabaseProvider.If you use the pool directly, keep in mind that a single thread must never be able to hold a lease on more than one connection simultaneously - doing so creates the potential for a deadlock.
Lightning's database connections provide access to the standard java.sql APIs. In addition, Lightning includes some quality of life improvement macros and classes. You should prefer using Lightning's NamedPreparedStatement to the standard java.sql.PreparedStatement.
To issue a database query and process the result:
// Note the usage of Java's try-with-resources to ensure proper freeing of resources.
// NamedPreparedStatement functions similarly to java.sql.PreparedStatement.
// Placeholders are named and prefixed with a ":".
// Create the prepared statement.
try (NamedPreparedStatement query = db().prepare(
             "SELECT * FROM users WHERE age >= :age;")) {
  // Fill in the placeholders in the statement.
  query.setInt("age", 21);

  // Executing the statement returns the standard java.sql.ResultSet.
  try (ResultSet result = query.executeQuery()) {
    // Advance the cursor while a next row exists.
    while (result.next()) {
      // For each row, use result.getXXX methods to read columns.
      String username = result.getString("username");
      doSomethingWith(username);
    }
  }
}
The complete database API:
// Initiates a database transaction on the queries contained in a closure.
// The closure may return nothing OR a value.
// If the given closure returns a value, transaction() will also return that value.
// If not specified, isolation level defaults to connection isolation level.
T value = db().transaction(() -> {
                               /* ... queries ... */
                               return (T)value;
                           })
T value = db().transaction(() -> {
                              /* ... queries ... */
                              return (T)value;
                           },
                           isolationLevel)
db().transaction(() -> { /* ... queries ... */ })
db().transaction(() -> { /* ... queries ... */ }, isolationLevel)

// Return underlying java.sql.Connection.
db().raw()

// Prepare a NamedPreparedStatement (optionally filling in some values).
// Example Format: SELECT * FROM mytable WHERE name = :name;
// Use an SQLNull of the appropriate type as a value in the map to set a NULL.
db().prepare(query)
db().prepare(query, colNameToValMap)

// Prepare an INSERT or REPLACE statement into a given table using the given
// map of column names to column values.
db().prepareInsert(table, colNameToValMap)
db().prepareReplace(table, colNameToValMap)

// Paginate an SQL query (in NamedPreparedStatement format).
// Given query must not already contain a LIMIT clause.
// Map specifies the parameters for the NamedPreparedStatement.
DatabasePaginator results = db().paginate(query, colNameToValMap, pageSize)
results.getTotalPages()
results.getTotalRows()
results.getPageSize()
results.getSizeOfPage(k)
results.hasPage(k)
results.forEachRowInPage(k, (ResultSet row) -> { ... })
results.forPage(k, (ResultSet row) -> { ... })
results.getQueryForPage(k)
Lightning provides SQLNull and ResultSets to help deal with the poor support for reading and setting NULL values in the built in java.sql APIs. Further, NamedPreparedStatement provides some convenience methods for common operations (execute an update and close, fetch inserted keys, etc).
An example of utilizing transactions:
long customerId = db().transaction(() -> {
  long insertedId = db().prepareInsert(
    "customers",
    ImmutableMap.of(
      "name": "Bob",
      "email": "bob@example.com"
    )
  ).executeInsertAndClose();

  db().prepareInsert(
    "logs",
    ImmutableMap.of(
      "type": "CREATE_USER",
      "customer_id": insertedId
    )
  ).executeUpdateAndClose();

  return insertedId;
});
External DBs and Tools
To utilize an external tool, the simplest way is to dependency inject an instance of the tool.
For the remainder of this article, we will provide an example of how one might utilize Lightning with the popular open source database RethinkDB. You could generalize this to support any external tool or database system.
To get started, you must first add the RethinkDB Java connector as a Maven dependency by altering your pom.xml. Then, to integrate RethinkDB with Lightning, we will build an instance of a connection pool and then dependency inject that connection pool.
public final class AppLauncher {
  public static void main(String[] args) throws Exception {
    Config config = makeConfig();
    InjectorModule injector = new InjectorModule();
    // Build a connection pool and dependency inject it.
    // NOTE: RethinkDBCP is not provided by the official driver, you'll need to write
    // your own connection pool or pick an open source one. Conceptually, for the
    // purpose of this tutorial, there's no difference.
    injector.bindClassToInstance(RethinkDBCP.class, makeRethinkDBCP());
    (new LightningServer(config, injector)).start().join();
  }

  public RethinkDBCP makeRethinkDBCP() throws Exception {
    // Build and return a connection pool for the desired database.
    // You need to implement this.
    throw new NotImplementedException();
  }

  public Config makeConfig() throws Exception {
    // Build and return your desired config.
    // You need to implement this.
    throw new NotImplementedException();
  }
}
To make using the pool more convenient, you can create an AbstractController from which all other controllers will inherit. AbstractController will provide a convenience method r() which returns a database connection from the pool.
@Controller
public abstract class AbstractController {
  private RethinkDBPool pool = null;
  private Connection connection = null;

  @Initializer
  public void initialize(RethinkDBPool pool) throws Exception {
    // Use an initializer to dependency inject the connection pool and store
    // a copy on the instance. You could also do this on a constructor, but
    // initializers are nice because they don't require additional code in
    // subclasses.
    this.pool = pool;
  }

  public Connection r() throws Exception {
    if (pool == null) {
      throw new IllegalStateException();
    }

    if (connection == null) {
      // Only reserve a connection from the pool on the first call to r().
      // Means no resources are consumed if controller doesn't need a connection.
      // Return the same connection instance on subsequent calls.
      // NOTE: getConnection may block until a connection becomes available.
      connection = pool.getConnection();
    }

    return connection;
  }

  @Finalizer
  public void finalize() throws Exception {
    // Use a finalizer to return the opened connection (if any) to the pool.
    if (connection != null) {
      connection.close();
    }
  }
}
Using the database in a controller is now simple:
// NOTE: Extend the AbstractController class that we created.
public final class MyController extends AbstractController {
  @Route(path="/", methods={GET})
  public void handleRequest() throws Exception {
    // Just invoke r() to obtain a connection.
    // The connection will be automatically released once we return from the route handler.
    r().table("table").insert(...);

    // The second call to r() returns the same connection the first one did.
    r().table("table2").insert(...);
  }
}
Server Control
LightningServer encapsulates a single instance of Lightning with its own configuration. You may run multiple instances of Lightning in the same process by creating multiple instances of LightningServer.
Each instance of LightningServer may be independently stopped and started.
package myapp;
import lightning.server.*;
import lightning.inject.*;
import lightning.config.*;

public final class AppLauncher {
  public static void main(String[] args) throws Exception {
    Config config = new Config();
    InjectorModule injector = new InjectorModule();

    // ... set up config and injector ...

    // Create a new server.
    LightningServer server = new LightningServer(config, injector);

    // Tell the server to start responding to requests.
    // start() will not return until the server is ready to respond to requests.
    server.start();

    // Block the calling thread until the server is stopped.
    // stop() may be invoked in another thread to stop the server.
    server.join();
  }
}
Packaging & Deployment
Lightning applications can be packaged into a stand-alone JAR file for deployment to a production server. The server need only have a JRE 1.8+ to run Lightning. In order to deploy properly, you must make sure that you are following the Maven directory structure guidelines and properly placing resources into the classpath (/src/main/{resources|java}).
You may use a JAR packager of your choice. We have found the Maven assembly plugin to be very useful and fast at packaging. To utilize the assmebly plugin, you need to modify your pom.xml:
<!-- To build the JAR, run 'mvn assembly:single'.
     Compiled JAR will be in target/ folder. -->

<project>
  ...
  <build>
    ...
    <plugins>
      ...
      <plugin>
        <artifactId>maven-assembly-plugin</artifactId>
        <configuration>
          <archive>
            <manifest>
              <mainClass>path.to.AppLauncher</mainClass>
            </manifest>
          </archive>
          <descriptorRefs>
            <descriptorRef>jar-with-dependencies</descriptorRef>
          </descriptorRefs>
        </configuration>
      </plugin>
      ...
    </plugins>
    ...
    <resources>
      ...
      <resource>
        <filtering>false</filtering>
        <directory>src/main/resources</directory>
        <includes>
            <include>**</include>
        </includes>
        <excludes>
        </excludes>
      </resource>
      <resource>
        <filtering>false</filtering>
        <directory>src/main/java</directory>
        <includes>
          <include>**</include>
        </includes>
        <excludes>
          <exclude>**/*.java</exclude>
        </excludes>
      </resource>
      ...
    </resources>
    ...
  </build>
  ...
</project>
Recommendation: We recommend setting up your launcher class to accept a configuration file as a command-line argument rather than packaging your configuration into the JAR.
Once packaged to a JAR, you can run your application as you would any other Java JAR:
$ java -jar /path/to/app.jar arg1 arg2 ...
You might want to read about optimizing Jetty under high load if you are using Lightning for a very popular application. You can tune the garbage collection parameters, Lightning configuration, and some OS settings to improve your performance.